V2Ray+WebSocket+TLS+CDN
可能是由于最近墙的升级,使用SS等方式翻墙IP被墙的概率大大提升(2台小鸡GG,然后新开一台搭建SS,使用2天就GG),所以写一篇介绍全新的姿势,可以复活已经被墙的IP。在速度和稳定性上选择了后者
重要说明本文是针对VPS的IP已经被墙的情况下,如何继续翻墙,如不想这么复杂,请参看如下文章(搭建V2Ray使用特有的Vmess协议即可):
涉及如下:V2Ray+WebSocket+TLS+CDN
- V2Ray是一个集成了各种翻墙协议的软件,包括Socks(目前接触到的是本机到本机)、HTTP、Shadowsocks(目前接触到的是本机到远程)、VMess等,传输载体可以是TCP、mKCP、WebSocket等
- 使用WebSocket:因为CDN可以转发WS流量
- 使用https(TLS)伪装网站,请求流量数据
- 使用CDN转发流量,同时作为连接VPS的跳板,使VPS复活和隐藏
原理图如下: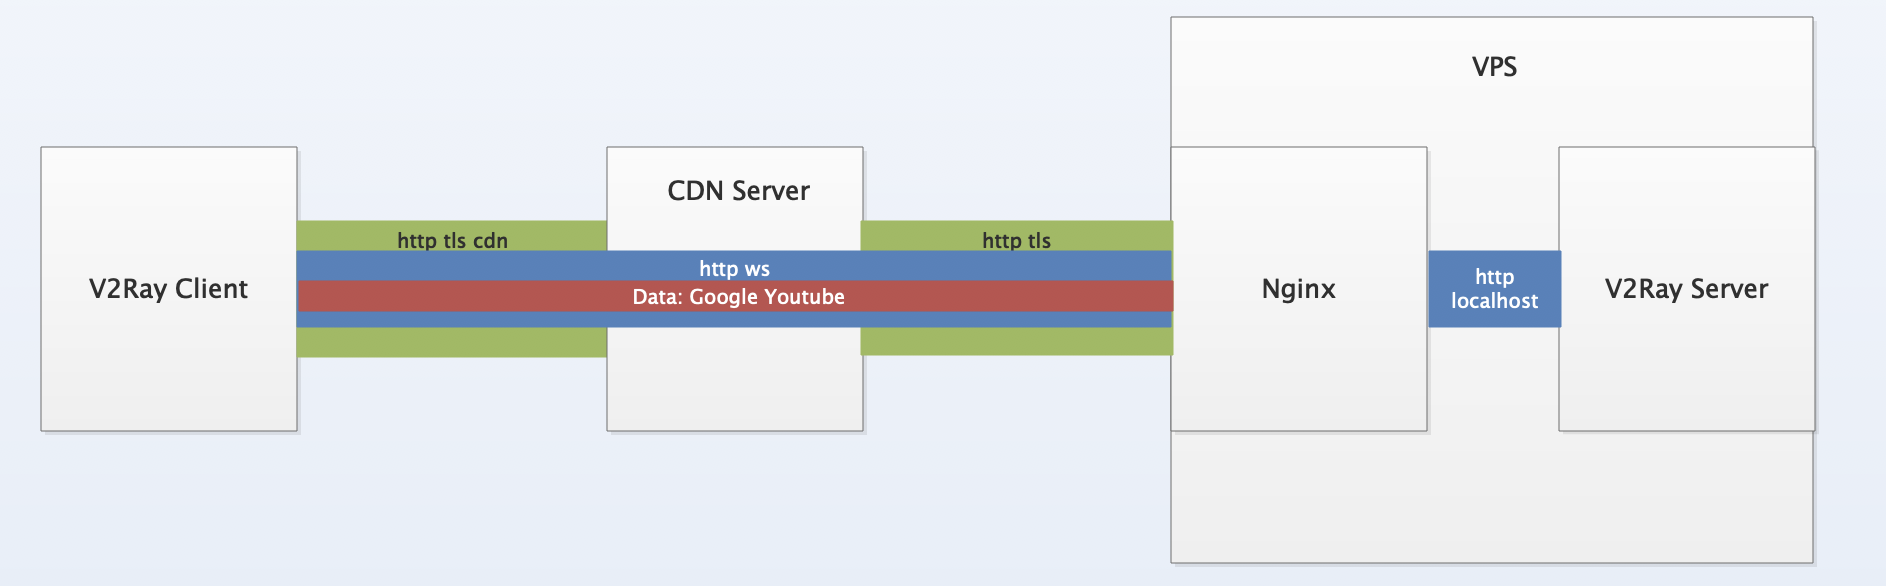
2 Preparations
准备工作如下:
- 一台VPS(IP已经被墙,IP假设为99.99.99.99)
- 域名(以zqq6666.tk为例)
- 注册CloudFare(免费CDN)
- 相关知识(Linux命令,Nginx配置,域名配置等)
CloudFare: https://www.cloudflare.com/
3 Installations and Configurations
3.1 安装Nginx
在VPS上,安装Nginx:
sudo apt=get update
sudo apt-get install nginx
编辑配置文件:
sudo vi /etc/nginx/sites-available/default
替换server_name:
将_替换为zqq6666.tk www.zqq6666.tk
重新载入Nginx:
nginx -s reload
3.2 申请证书
申请Let’s encrypt免费证书,先在域名注册商那里(freenom)修改dns,添加两个A记录,解析到VPS的IP 99.99.99.99,修改的原因是要向Let‘s encrypt要发起挑战,证明你拥有这个域名
申请证书:
sudo add-apt-repository ppa:certbot/certbot
sudo apt update
sudo apt install python-certbot-nginx

sudo certbot --authenticator webroot --webroot-path /var/www/html --installer nginx -d zqq6666.tk -d www.zqq6666.tk

# 会提示是否将所有http 301 重定向到https,根据需要选择
运行完上述命令之后,上述Nginx的配置也会更新(添加证书配置等)
因为申请到的新证书的有效期为90天,所以设置定时任务,定期检测更新证书:
# m h dom mon dow command
23 1 * * 6 certbot renew > /var/log/letsencrypt/renew.log
3.3 CDN设置
设置完证书后,就可以设置CDN
注册CloudFare账号,选择一个免费站点
更换Freenom处的NameServer为CloudFare的NameServer,把解析工作转移给CloudFare
等待CloudFare网站变为Active状态
3.4 安装配置V2Ray
VPS安装配置V2Ray
安装V2Ray:
# 官方一键安装脚本
bash <(curl -L -s https://install.direct/go.sh)
安装好后,会有V2Ray运行的端口,和一个Client的UUID PORT:26075 UUID:563a2749-ccfe-4754-959d-b8343faafeac (记住上述信息,并使用实际的更换)
编辑配置文件:
vi /etc/v2ray/config.json

# 在inbound的最后(settings之后)追加如下配置,记住videos路径

"streamSettings": {
  "network": "ws",
  "wsSettings": {
    "path": "/videos/"
  }
}
重启V2Ray:
service v2ray restart
3.5 继续设置Nginx
继续设置Nginx,反向代理到V2Ray
编辑/etc/nginx/sites-available/default:
# 添加类似如下设置
location /videos/ { # 路径为上面的路径
proxy_redirect off;
proxy_pass http://127.0.0.1:26075; # 端口要变成v2ray运行的端口
proxy_http_version 1.1;
proxy_set_header Upgrade $http_upgrade;
proxy_set_header Connection "upgrade";
proxy_set_header Host $http_host;
}
3.6 客户端
客户端选择和配置
客户端软件MacOS可以选择V2RayX:
https://github.com/Cenmrev/V2RayX
https://github.com/Cenmrev/V2RayX
其他Windows、Android等自行解决
最终的配置类似如下:
{
  "dns" : {
    "servers" : [
      "8.8.8.8",
      "8.8.4.4"
    ]
  },
  "inbounds" : [
    {
      "listen" : "127.0.0.1",
      "port" : 1086,
      "protocol" : "socks",
      "tag" : "socksinbound",
      "settings" : {
        "auth" : "noauth",
        "udp" : true,
        "ip" : "127.0.0.1"
      }
    },
    {
      "listen" : "127.0.0.1",
      "port" : 1087,
      "protocol" : "http",
      "tag" : "httpinbound",
      "settings" : {
        "timeout" : 0
      }
    }
  ],
  "outbounds" : [
    {
      "sendThrough" : "0.0.0.0",
      "mux" : {
        "enabled" : false,
        "concurrency" : 8
      },
      "protocol" : "vmess",
      "settings" : {
        "vnext" : [
          {
            "address" : "zqq6666.tk",
            "users" : [
              {
                "id" : "563a2749-ccfe-4754-959d-b8343faafeac", # 注意
                "alterId" : 64,
                "security" : "auto",
                "level" : 1
              }
            ],
            "port" : 443
          }
        ]
      },
      "tag" : "vultr",
      "streamSettings" : {
        "wsSettings" : {
          "path" : "/videos/", # 注意
          "headers" : {

          }
        },
        "quicSettings" : {
          "key" : "",
          "security" : "none",
          "header" : {
            "type" : "none"
          }
        },
        "tlsSettings" : {
          "allowInsecure" : false,
          "alpn" : [
            "http/1.1"
          ],
          "serverName" : "zqq6666.tk", # 注意
          "allowInsecureCiphers" : false
        },
        "httpSettings" : {
          "path" : ""
        },
        "kcpSettings" : {
          "header" : {
            "type" : "none"
          },
          "mtu" : 1350,
          "congestion" : false,
          "tti" : 20,
          "uplinkCapacity" : 5,
          "writeBufferSize" : 1,
          "readBufferSize" : 1,
          "downlinkCapacity" : 20
        },
        "tcpSettings" : {
          "header" : {
            "type" : "none"
          }
        },
        "security" : "tls",
        "network" : "ws"
      }
    }
  ],
  "routing" : {
    "name" : "all_to_main",
    "domainStrategy" : "AsIs",
    "rules" : [
      {
        "type" : "field",
        "outboundTag" : "vultr",
        "port" : "0-65535"
      }
    ]
  },
  "log" : {
    "error" : "/var/folders/06/f9wr_cnd1mdb0h4rxv504grw0000gn/T/cenmrev.v2rayx.log/error.log",
    "loglevel" : "warning",
    "access" : "/var/folders/06/f9wr_cnd1mdb0h4rxv504grw0000gn/T/cenmrev.v2rayx.log/access.log"
  }
}
4 References
基本教程
加上CDN
背后原理
Mac客户端
其他
https://www.dazhuanlan.com/2019/10/04/5d962810eb6c8/
没有评论:
发表评论